 Windows
 French Doors
 Patio Doors
 Front Doors
 Roller Shutters
 Window Sills
Windows
French Doors
Patio Doors
Front Doors
Roller Shutters
Window Sills
Window Sills
Windows
French Doors
Patio Doors
Front Doors
Roller Shutters
Window Sills

Available in a range of sizes, types, and materials, new sliding patio doors create a modern, insulating opening and provide generous views out. Once the product arrives, it is then necessary to fit it into the opening. This guide keeps the process of installing patio doors simple and gives an overview of the key steps.
For all our patio doors, whether lift and slide, tilt and slide, bifold, or smart slide, the door frames are fixed to the wall in same way. Each patio door type then differs in terms of how the door sash itself is then installed into the frame.
Materials
Before installing a patio door, it is important to have an overview of the steps as well as all necessary tools to hand.
Interior sealing tape or silicone will be needed, as well exterior sealing tape, and expanding insulation foam or pre-compressed tape.
The door surfaces should also be cleaned to prevent dirt from affecting sealing adhesion.
Protective clothes and glasses should also be worn.

The first step of patio door installation is to fix the frame to the wall. As part of this process, either expanding insulation foam or pre-compressed tape should be used. The procedure will then differ slightly based on which option is used – below the images we have provided instructions for both.

Because the process of how the patio door should be installed inside the fixed frame differs for each type, we have split the instructions into relevant sub-sections – just scroll down to view them or navigate using these links:
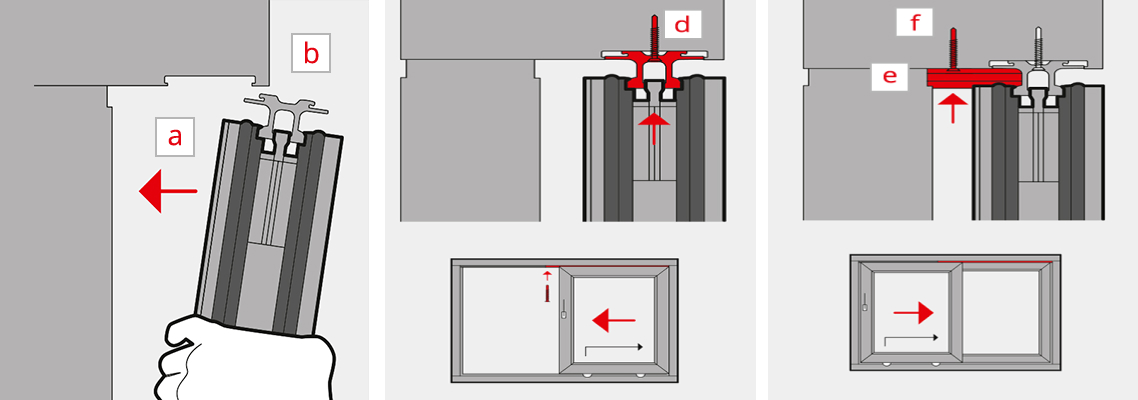
How a lift and slide or smart slide door sash should be fitted into the fixed frame differs slightly depending on its material. Below you will find the relevant instructions as well as useful images.

With their hinges and function, bifold doors installation is quite similar to that of a French door.


At windows24.com we are experienced in explaining European installation to international customers – if you have questions, just contact our in-house experts on +49 711 860 60 200, via email at info@windows24.com, or by arranging an appointment.
Our team can also provide tailored advice for those looking to install one of our patio doors ordered with a specific type or roller shutter or frame extension.
Book a meeting now


