+++ Save online price advantage now +++

How to Adjust Windows

Windows have to serve several functions simultaneously: They should open and close easily, provide thermal insulation and protect against drafts while still offering a perfect view. In order to fulfill all these requirements, it is critical that windows are properly adjusted. Luckily, adjusting windows yourself is easy to do without the expense of hiring professional help. With the right tools and our how-to guide, you’ll be all set..


1. Preparations

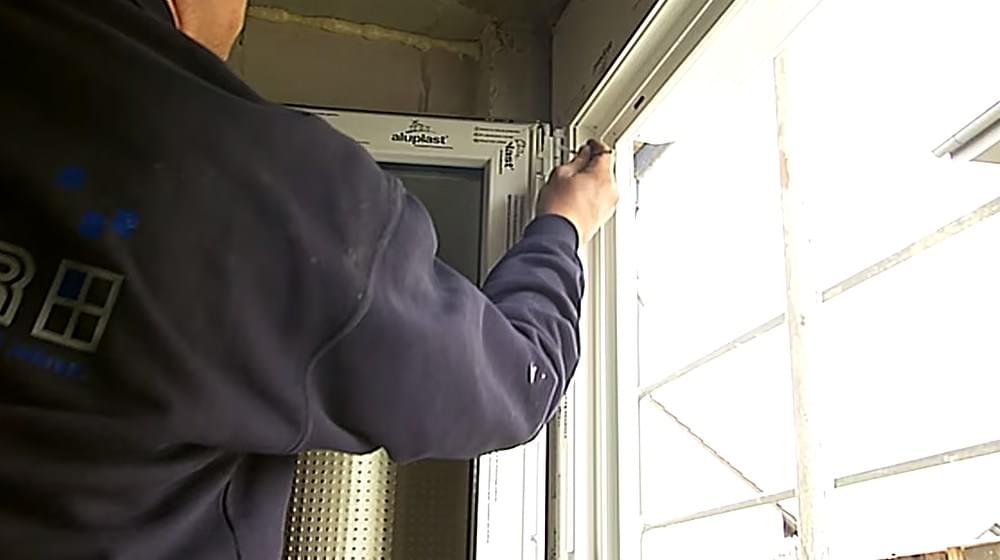
Before beginning, double check that you have all of the necessary tools in front of you, so you won’t need to stop in the middle of something. Confirm you’ve got the right screwdrivers and Allen keys (hex wrench) before starting to adjust the window. It is also a good idea to read through the entire article first so you already have a good idea of the whole process.

2. The tilt and turn mechanism

In order to properly work on and adjust your window, it is important to first understand how a casement window opening mechanism works. The most common is the "tilt and turn"-mechanism, consisting of several elements:

  • Handle: The locking pin can be found on the opening side of the window which also houses the handle. The window is opened or closed by turning the handle.
  • Lower corner hinge bearing: You can find the lower corner hinge bearing on the hinge side, opposite the handle.
  • Upper stay arm bearing: The upper bearing capturing the stay arm is also located on the hinge side, but above the lower corner bearing.
  • Locking pins and mushroom cams: If you have security frames, you will probably find pins on different sides. On most standard models, you will find them on the opening side.

3. Determining your window type

This article outlines how to adjust modern casement windows. These are usually equipped with adjusting screws in the hinge bearings, while older models may not be. We recommend consulting professionals if you own older windows. To begin with, you should check whether the window has the respective adjustment elements. You can easily recognize them by the cover caps on the hinge side.

Regardless of what material your window is made of, there is no difference in the adjustment process. All steps are the same, meaning you can adjust uPVC windows the same way as aluminum or wooden ones.


Old wooden frames often do not need to be adjusted. New sealing putty is usually sufficient.

4. Adjustment the windows

There are four ways of adjusting windows:

  • Diagonal casement adjustment
  • Parallel horizontal adjustment
  • Parallel vertical adjustment
  • Contact pressure adjustment

When adjusting new windows, all of these steps should be taken. However, if a window has warped over time, you may only need to take one of these steps, based on how your window is malfunctioning. The actual adjustment process can be divided into two different types of steps – must-do steps and those that depend on the malfunction.

There are a number of steps which will have to be performed no matter what.

  • First, identify the problem. Is it jamming, is a draft coming through – and where are the problems occurring?
  • Measure the space between casement and frame for later adjustment. In particular, measure the distances on both the side where the window is jamming or the draft is coming from, as well as the opposite side. For example, If the jam is occurring on the left side of the frame, you should to measure the distance between casement and frame on the left as well as on the right-hand side.
  • Remove the covering caps from the stay arm and lower corner bearings, located on the hinge side. This exposes the adjusting screws which are necessary for the following steps.

a) What to do if the window hangs askew?

Non-parallel running casements can be adjusted via the corner bearing:

  • Turn the adjusting screws clockwise to lift then window casements and counterclockwise to lower them. Adjust until the casements and frame are parallel to each other (Fig. 1).
  • Now check if the change has created problems in other areas (e.g. new gaps appearing). If this happens, follow the steps as described in c, d or e.

b) Fixing jams

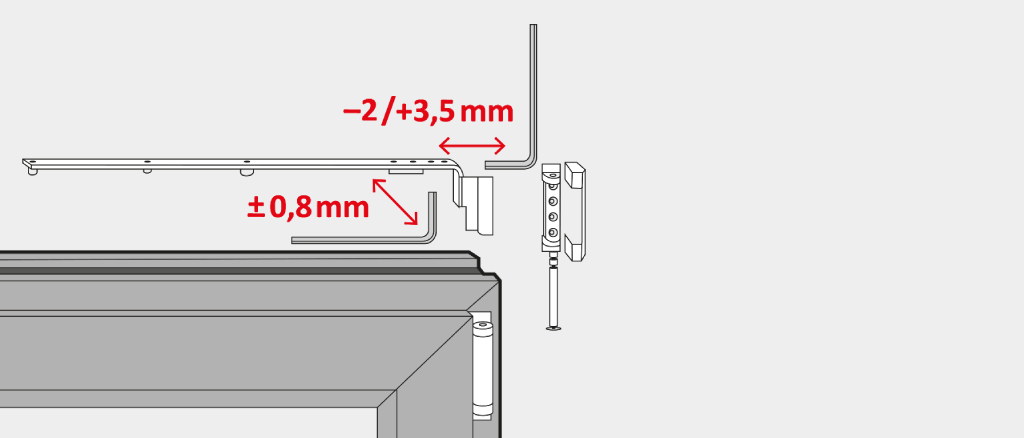
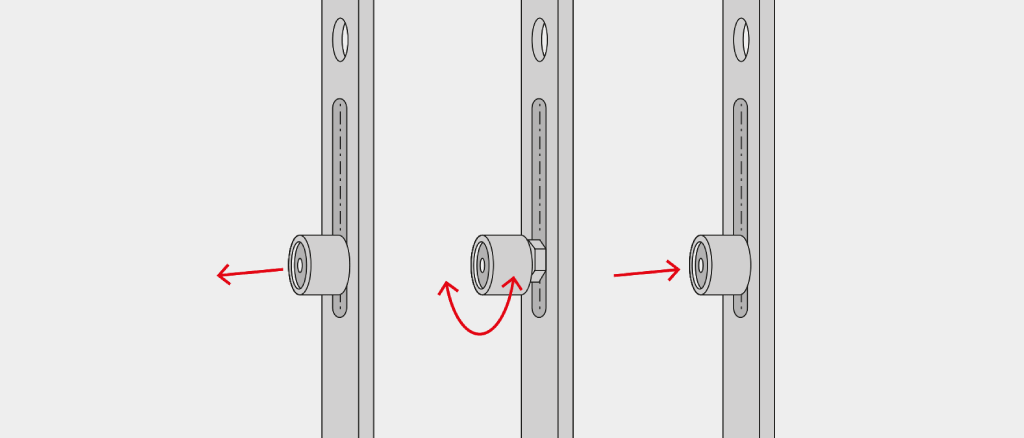
If the window is jamming at the left or right-hand sides, you should make lateral adjustments on the horizontal plane. This is done with both bearings.

  • Turn the screws in the lower corner and stay arm bearings alternately to adjust the window’s horizontal orientation. If you turn the stay arm bearing clockwise and the corner bearing counterclockwise, the window will move towards the hinges laterally. To move towards the handle, turn in the other direction (Fig. 2).
  • After adjusting laterally, check whether the window can be opened smoothly. If the screws were turned too much, the window might now jam on the other side of the frame.

c) How to correct vertical positioning

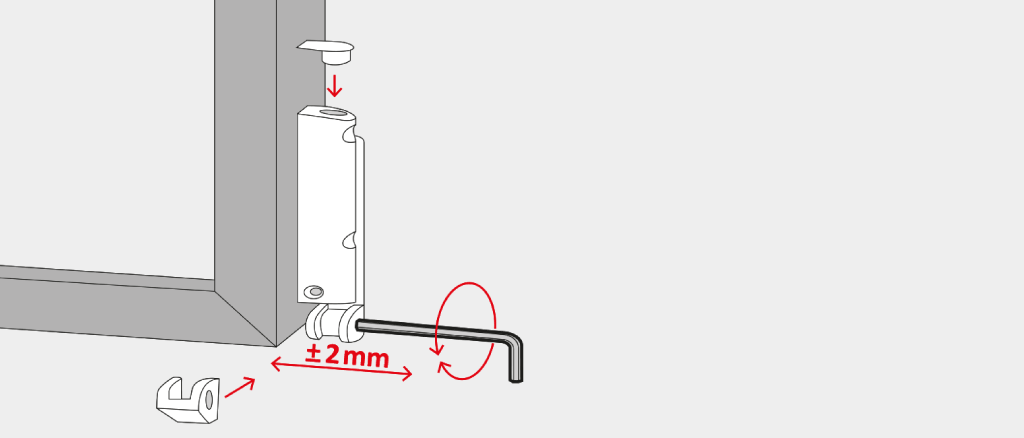
If the window casement brushes against the lower or upper parts of the frame during opening or closing, you may have to adjust its height.

  • On both sides, determine the distance necessary in order to center the casement inside the frame.
  • Turn the screw in the lower corner bearing counterclockwise to lower the casement, or counterclockwise in order to lift it up. When the correct height has been reached, tighten the screw in the stay bearing until the casement sides run parallel to the frame (Fig. 3).

Washers can be very helpful when adjusting a window casement.

d) Adjusting contact pressure if necessary

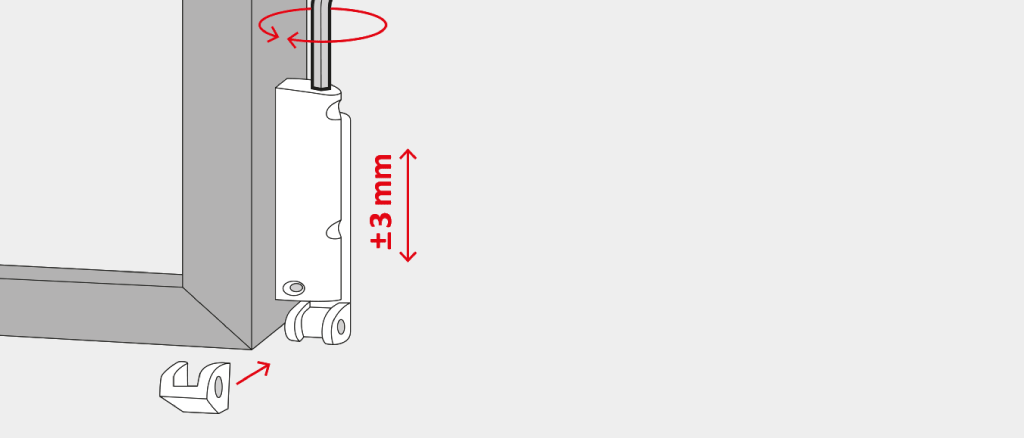
Special adjustment is necessary if the casement is centered in the frame, but there is still a noticeable draft – or when opening the window is easy but closing it requires a lot of effort. The following steps will explain how to adjust the contact pressure:

  • Find the locking pins. These pins may be located on the opening side in almost all standard windows. For variants with additional security features, you may need to check both the opening and hinge sides.
  • After the locking pin is pulled out, turn it clockwise or counterclockwise, to decrease or increase the contact pressure between casement and frame (Fig. 4).
  • You should now check whether the pressure is too high or low. Generally, a window should open with minimal effort, but still close and seal tightly.

5. Regular adjustment prevents the need for professional craftsmen

By following these steps, it should be easy for home owners and DIY enthusiasts to adjust windows on their own whenever required. Knowing the techniques behind the adjustment process and understanding the window mechanism can help you avoid spending money on professional help. Furthermore, these steps also work for adjusting patio or balcony doors.


Was this information useful?
1
2
3
4
5
(67 ratings , Ø 4)
to top