+++ Save online price advantage now +++

The Installation of a Fit Front mounted Roller Shutter

Whether working on an old or a new building: anyone deciding to install a built-on roller shutter system should focus on quality. Only high-quality products offer reliable insect and sound protection as well as thermal insulation. The installation should be performed in a professional manner and with care. You will be pleased to know that new built-on roller shutters do not need to be installed by professionals. This manual will show you how to install these components in a simple and straightforward way.


1. Preparations

Installing new aluminium, uPVC or steel reinforced built-on roller shutters requires all materials and tools, listed in this manual.

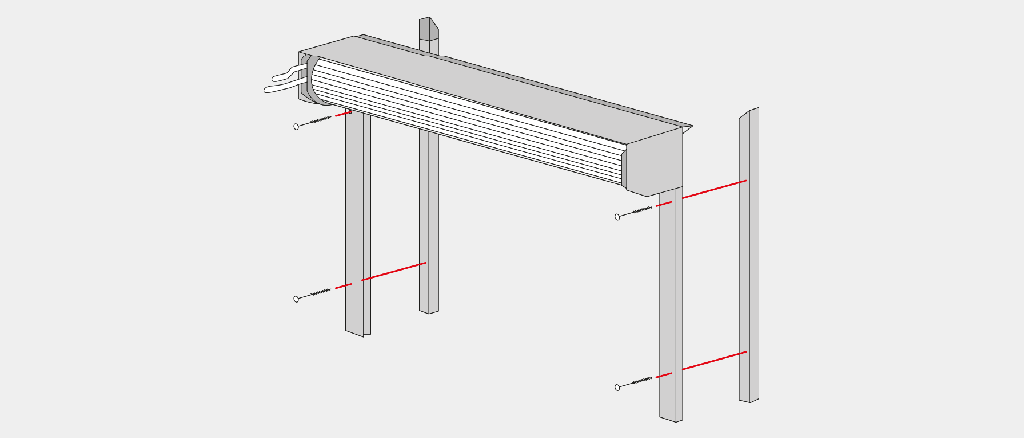
It is advisable to re-measure the relevant dimensions before the installation. This is to ensure that the new built-on roller shutter fits perfectly above the respective window.

  • Measure the window dimensions and write down the figures. Please pay attention to the fact that the measurement procedure in old buildings is different to the one in new buildings.
  • In order to ensure an efficient and smooth installation of your new built-on roller shutter, you should unpack all necessary parts and place them near the working area. Please place the box and the guides on a soft mat.

The installation of uPVC and aluminium built-on roller shutters should always be performed in a group of two. An extra pair of hands can be very helpful for the mounting of the roller shutter box.

2. Installation of a built-on Roller Shutter with Cord

A built-on roller shutter is mounted on the outside window. The holes for the strap need to be drilled first.


a) Drilling Holes for the Cord Winder

  • Use the yard stick to determine the dimensions for the cord winders exit hole and copy the measurements onto the exterior window frame with a pen.
  • Now drill the respective hole, using the electric screwdriver. There should be sufficient space for the strap, to prevent unwanted friction. You can take the cord width (14 mm) as basis and drill with a 16 mm bit. The winder will then have 2 mm space.

Please pay particular attention if you want to install a built-on roller shutter onto an existing window. The working ladder must be sufficiently protected. If the window has an inswing function, you should perform the installation from inside.

b) Mounting the guiding Rails for the built-on Roller Shutter Box

  • Connect the guides to the box, by pushing them into the existing catch.
  • Guide the cord from the outside through the previously drilled holes in the frame. Make sure that it can run smoothly and does not rub on the uPVC or aluminium parts after installation.
  • Put the construction in an upright position at the respective window. Should the built-on roller shutter be installed onto an already existing window, you have to keep the element and guides in the correct position during the entire mounting process. This step should be performed in a group of two.
  • Align the guides parallel to each other vertically downwards the window. Use the bubble level for this step to ensure that the shutter can be rolled down completely. This step offers the most effective protection against insects and improves thermal insulation of the house.
  • Screw-in the guiding rails with the electric screwdriver in the upper section of the frame. After all screws are flush, you can attach the corresponding plastic covers.

Open and close the shutter to locate possible blockades. If the construction component can be rolled down smoothly, the installation has been performed correctly.

c) Installation of the Guides

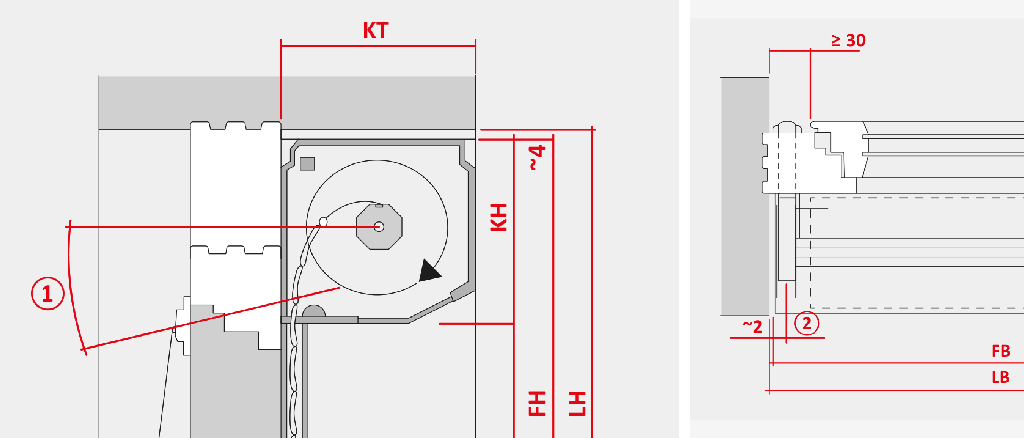
First, you need to unroll the strap from the winder in its entirety.

  • Guide the strap through the respective guides and push it through the hole in the frame. Make sure that it runs straight and does not twist.
  • Mount the guide for the strap to the frame with the screws provided, using a cordless electric screwdriver.

d) Preparing and installing the Cord Winder

  • Open the box of the cord winder and lead the strap through the opening.
  • Take the cutter and cut a 1 cm centred slit in the lower section and connect the band to the respective hook on the roll.
  • To add tension to the winder spring, you need to push the respective security hook. The spring is now under tension.
  • Close the box and mount the cord winder in the desired position. The recommended position is located 5 cm from the windowsill.

For any additional questions about the installation procedure, please refer to the detailed video manual.


3. Installation of a built-on Roller Shutter with Crank

The installation procedure for a built-on roller shutter with a crank is not dissimilar to the process explained previously. You need to perform the following steps:

a) Drilling Holes for the Crank

  • The measuring and drilling process is equivalent to the procedure for a build-on shutter with cord. Like with instruction 1a), make sure that the strap has about 2 mm play.

b) Mounting the guiding Rails for the built-on Roller Shutter Box

  • Assemble guides and shutter box as explained in 1. b). Adjusting and mounting of guides and box are similar to the method above.
  • Please guide the crank through the drilled opening in the frame. Ascertain that the square shaft does not tilt and that the guides are exactly parallel. This ensures that the shutter can be rolled down to the threshold and further improve thermal insulation.

c) Installation of the Crank

  • Mount the crank with the cordless electrical screwdriver and the accompanying screws. The crank can easily be attached to the frame inside.
  • If you ordered an additional crank holder, you can mount it at the desired position as well.

4. Installation of a built-on System with Motor

The installation procedure with motorized versions is also very similar to the other models. Particular attention should be paid to the installation of the control panel.


a) Drilling Holes for the Cables

  • The procedure is identical to step 1.a). You only need to consider that the cable must be guided through the hole from outside. Different to square shaft and cord, the cable does not need extra space. The respective hole can either be drilled into frame or masonry.

b) Mounting the guiding Rails for the built-on Roller Shutter Box

  • The procedure with a motorized system is again equivalent to the instruction 1.b). Please pay attention to the parallel position of the guides. This will ensure best insulation values.

c) Installation of the Control Panel

  • Similar to the installation of the crank, the control panel needs to be installed next to the frame. The installation has to be performed by an electrician. He will install the necessary buttons and electric parts in the most professional way.
  • Motorized systems have default factory settings. You need to check, whether you are satisfied with it or you have to adjust the settings to your needs.

Aluminium an uPVC built-on roller shutters are not just a good long-term investment in terms of insect protection and thermal insulation – they also effectively reduce noise. Furthermore they allow dimming the light in houses and improving the aesthetics.

Almost every built-on roller shutter can be ordered with steel reinforced threshold. This will additionally improve burglary protection with single- and multi-family houses. If you install your built-on roller shutter with the help of this instruction manual, you will not need window fitters. The installation in old and new buildings can easily be performed without professional help.

Was this information useful?
1
2
3
4
5
(1 ratings , Ø 5)
to top