+++ Save online price advantage now +++

How to Adjust a Front Door

Especially newly installed doors can cause problems; they can jam, be difficult to open or can scratch on the tile floor in the entrance area. One might think that only professional help can solve this problem. But that is not the case, even laymen can easily adjust front doors – with little to no cost involved. No matter if it is difficult to close, scratches or jams, all you need are: craftsmanship, common tools and this manual that explains step-by-step how to adjust your front door.


1. Necessary Preparation for the Adjustment of the Front Door

This manual can generally be used to adjust any door type, as long as its hinges do not differ too much from the contemporary layout. It is not relevant whether the door is made of wood, uPVC or aluminium, however these models may have different hinges.

In order to adjust the front door, you will have to gain access to the adjusting screws. In modern building components, these screws are integrated into the hinges. You will need to check the data sheet of your specific front door for information on the respective location of the screws in the hinges. Please note that many older front doors do not have any adjusting screws at all. In this case, the adjustments are significantly more complicated procedures; in such a case, professional help is highly recommended.

Please make sure that all necessary tools as well as a ladder are ready for use at the work place. This will simplify the adjusting procedure, prevent the search for the right material and ultimately save time.

In order to fix the height, you can use additional accessories like washers and insert them between casement and frame.

2. Manual for the Adjustment of the Front Door

You can adjust front doors in three different ways:

  • If the leaf scratches on the threshold or jams at the upper part of the frame, you will need to adjust the height.
  • If the leaf gets stuck on the side parts of the frame, the horizontal position will need to be adjusted.
  • If everything is adjusted vertically and horizontally, but heat and drought are still passing through the insulation, the contact pressure will need to be adjusted.

With newly installed front doors, it is recommended to perform all three methods. Further adjustments or corrections can be performed, with just one or two of the methods later.

Please take care to adjust the hinges evenly. Irregularities in the adjustment can lead to tension in the front door and cause damage in the long term.

a) How to adjust the Height

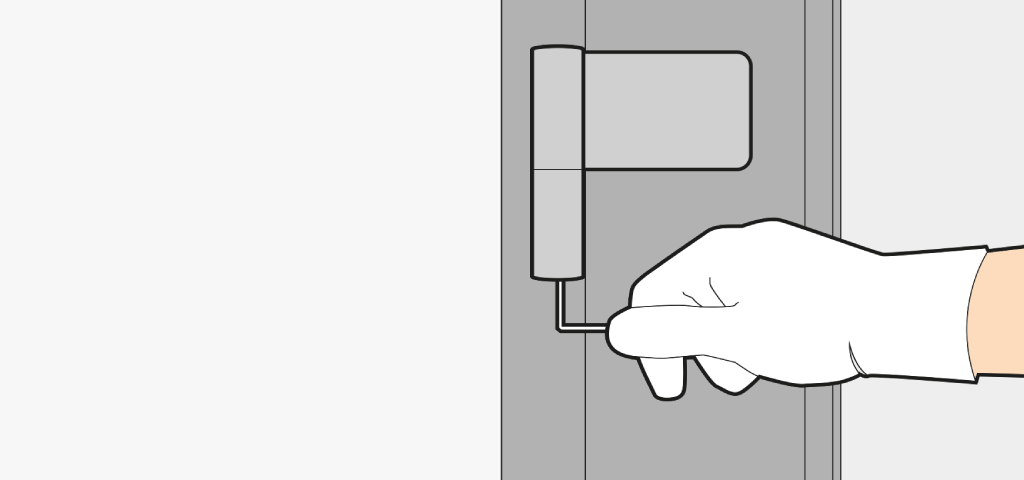
You need to follow these simple steps to adjust the height of front doors.

  • Remove the cover of the vertical adjusting screws. They can usually be found at the part of the hinge which is connected to the doorframe. It is sometimes necessary to remove a fixation screw from the casing first.
  • Use an Allen key to adjust the respective screws. Turn them clockwise to lift the casement and counter clockwise to lower it. Please make sure that the vertical adjusting is performed at the lower hinge first.
  • After adjusting the lower hinge, you need to screw the height-adjusting element in tight until the entire weight of the door is balanced evenly on both hinges (Fig. 1).

Common height modification during this process varies between -1 and +5 mm.

b) How to adjust the Sides

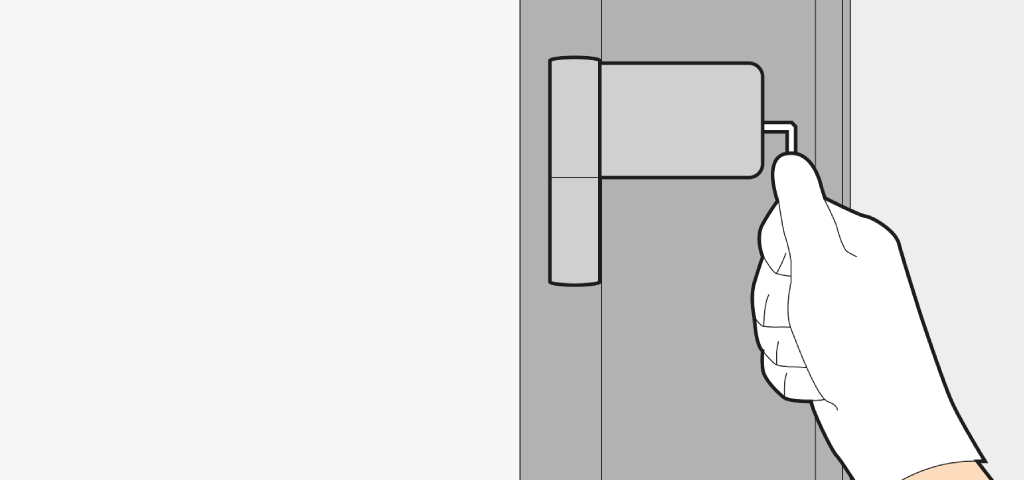
The adjustment process of the sides is very similar to the one for height.

  • To reach the screws you will need to remove the covering caps from the hinges. It is usually not necessary to remove the fixation screw.
  • Adjust the screws until the scratching or jamming is corrected. In order to avoid further problems, please do not only check the balanced weight on both hinges with your eye. Please use the bubble level to check if the casement is perfectly vertical.
  • If the problem cannot be solved by horizontal adjustment, you will need to check if it can be solved with another adjustment method (Fig. 2).

The common side modification of a modern door can vary between +5 and -5 mm during this process.

c) How to adjust the Contact Pressure

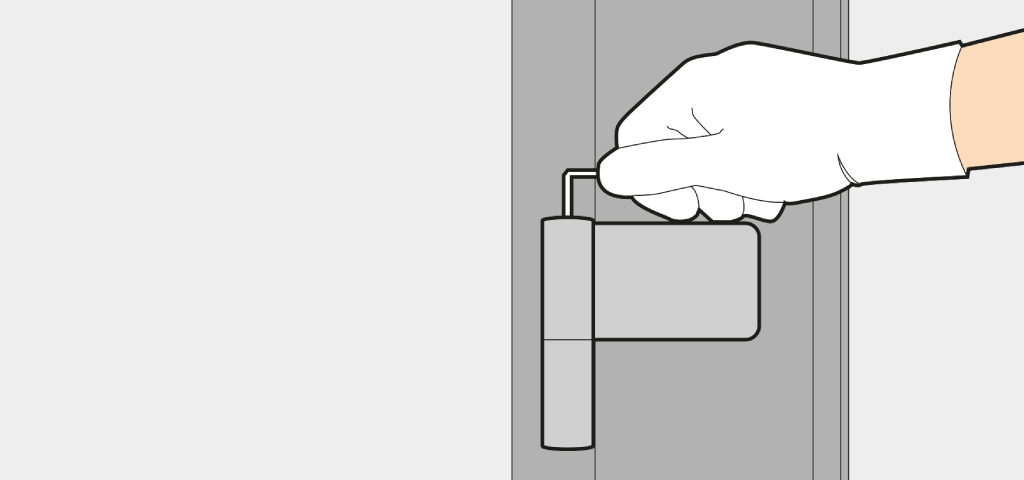
Effective thermal insulation calls for the correct contact pressure adjustment.

  • Open the cover for the screws, that determine the contact pressure. They can usually be found opposite to the ones for height and secured with a clamping screw.
  • Adjust the contact pressure evenly on both hinges with an Allen key. Make sure that the door can be closed easily afterwards and that there are no gaps. If the pressure is too high it can make it harder to close the door and can lead to damage in the thermal insulation (Fig. 3).

The common modification of the contact pressure can vary between +2 and -2 mm

3. Regular Maintenance can guarantee the Longevity of Front Doors

The adjusting of the front door should not only be a one-time event after first installation. The front door function should be checked regularly to improve longevity. As this is a very easy procedure, laymen can easily perform it themselves. This manual can help to not only teach the basics of door readjustments, it can also prevent additional costs for professional help.

Was this information useful?
1
2
3
4
5
(1 ratings , Ø 5)
to top