 Windows
 French Doors
 Patio Doors
 Front Doors
 Roller Shutters
 Window Sills
Windows
French Doors
Patio Doors
Front Doors
Roller Shutters
Window Sills
Window Sills
Windows
French Doors
Patio Doors
Front Doors
Roller Shutters
Window Sills
A back door can also be installed independently – i.e., without a craftsperson – because no expensive special tools or special skills are required. However, focussed, planned work is important, because the entire "back door" system can only comply with the manufacturer's specifications for thermal insulation and other properties if the door system is installed correctly.
Detailed instructions for installing a back door are therefore essential for a smooth process
Material list
Tool list
The door system, which is usually delivered as one unit and consists of a door leaf and frame as well as various accessories, should be laid out in as structured a way as possible together with the required tools before starting the actual installation. In order to be able to install modern back doors made from uPVC, wood or aluminium with as little effort as possible, the door leaf should be lifted out of the frame in advance.
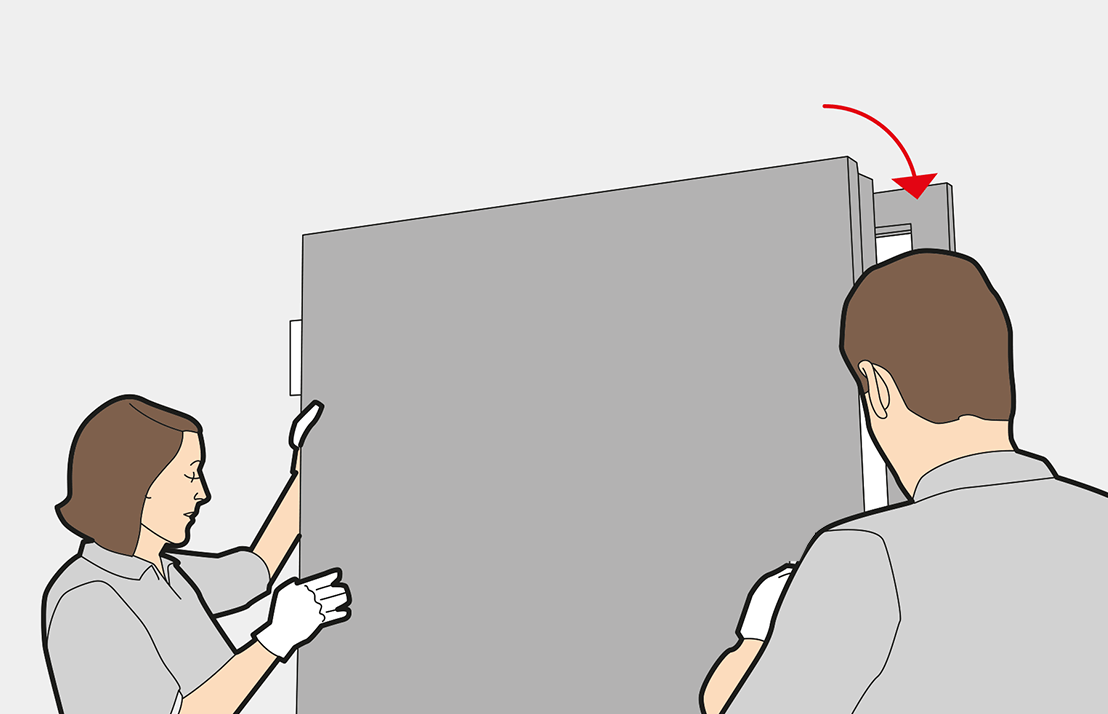
The door leaf for a modern back door can generally be dismantled without assistance. However, with a helping hand, lifting it out is easier and faster – the risk of damaging the door is also reduced. It is particularly easy to remove the back door when the door leaf is at a 90° angle to the frame. If it is tilted away from the frame, the lower hinge part of the frame detaches almost automatically from the upper hinge part of the door leaf (Fig. 1).

A back door often comes with protective foils and covers. The foils can remain glued over a large area in order to avoid damage during installation. However, they should definitely be removed from the outside of the frame. The other foils should be completely removed no later than three months after delivery, but preferably immediately after installation, since the binding agent contained in the adhesive can form permanent residues on the back door. In order to be able to ideally fit a back door frame, some materials that are often not included in the scope of delivery are required for installation (Fig. 2).

Before the frame can be installed, it must be prepared for one of three types of insulation. There are three levels at which the back door can be sealed.
")
After the preparation, the frame can be installed in the embrasure opening. Aligning the door frame using a spirit level is arguably the most important step for a back door that fits perfectly. If the frame falls to one side, the door leaf closes or opens automatically after installation.
The correct fit is achieved by aligning it using washers, wooden wedges or small pressure pads that can be pumped up by hand to the nearest millimetre. The alignment should be checked on all sides using a spirit level.
In order to hold the frame in its final position, it is screwed into the masonry. If the holes required for this have already been drilled into the frame, you only need to pre-drill the embrasure at the appropriate points. If the holes have not yet been made, the mounting holes are distributed as follows:
After pre-drilling the frame, the necessary holes should also be drilled into the embrasure – the holes just created in the door frame can be used as a kind of template to achieve a flush result. The frame can then be screwed into the masonry (Fig. 4).

After all the screws have been attached, check how the back door hangs should be checked using the spirit level. The spaces between the frame and the embrasure can then be filled with building foam.

This step is easiest to do if you have a second pair of hands. For installation, the sash for the back door must be placed in the middle of the frame. You can then install the door leaf parallel to the frame (Fig. 6). Once it sits in the hinges, the locking pins are inserted. You should now check how the door hangs and adjust it if necessary. windows24.com also provides helpful tips for installing the back door.

When all the steps have been carried out carefully and the door leaf has been ideally adjusted, the back door installation is complete and it will provide reliable protection against weather conditions and possible break-in attempts.